Showing posts with label foodtube. Show all posts

Thursday, 24 September 2015

Fruity Tutti No Bake Engery Bars

Clean Eating.

Raw Fruit and Nut Energy Bars:


Gluten Free, Wheat Free, Re-fined Sugar Free


Here's my recipe for Raw Fruit and Nut Energy Bars, a super tasty, quick and easy recipe that you can enjoy making with the kids for their packed lunches or in your spare time with the anticipation of the ever pending 'hangry' (hungry and angry) moments, where your suddenly in need of a quick pick me up but don't want to delve in to the abyss that is sugar overload land with the usual on the go snack. Hope you enjoy!


Raw Fruit and Nut Energy Bars


Ingredients:

75g almonds
40g dried apricots
5 medjool dates (stones removed)
1/2 tsp ground ginger
A pinch of cinnamon and nutmeg
20g dried cranberries
20g seedless raisins
Sprinkle of sunflower seeds


Method:

1. In a food processor blitz the almonds until a fine, bread crumb consistency.
2. Remove the almonds to a separate bowl and then again, in the food processor blitz your dried fruit, seeds and medjool dates until broken up in the small chunks.
3. Then add the previously ground almonds and the ginger, cinnamon and nutmeg to mix in the food processor and blitz until fully combined.
4. Transfer the mixture to either a flat glass dish or a plastic container. Press down firmly, I usually make mine about 1.5 -2 cm thick.
5. Store in the fridge for a few hours before consumption to allow the mixture to firm in to a bar. (I usually leave mine for half a day/ a day, depending on when the snack monster awakens.. ;)).
6. Once firm, cut in too 4-5 bars and snack away, guilt free knowing it's 100% healthy and happy.
(You could store these bars in the fridge in a air tight container or wrap in cling film. These bars are great for packed lunches or an on the go tasty energy boost.)


Hope you all enjoyed this recipe and hopefully give it a go! You wont be disappointed, they're (in my opinion) the best on the go snack out there and 100% good for you and super quick and easy to create a batch! As always, feel free to comment below or tag me on instagram and twitter. (I:@apesjackson and T:@aprilroseo)if you recreate this recipe or one similar!

Much love,  -A
Xx


That's all for now folks,


XOXO -A
<3

Sunday, 12 July 2015

Cappuccino and Chocolate Birthday Cake Recipe

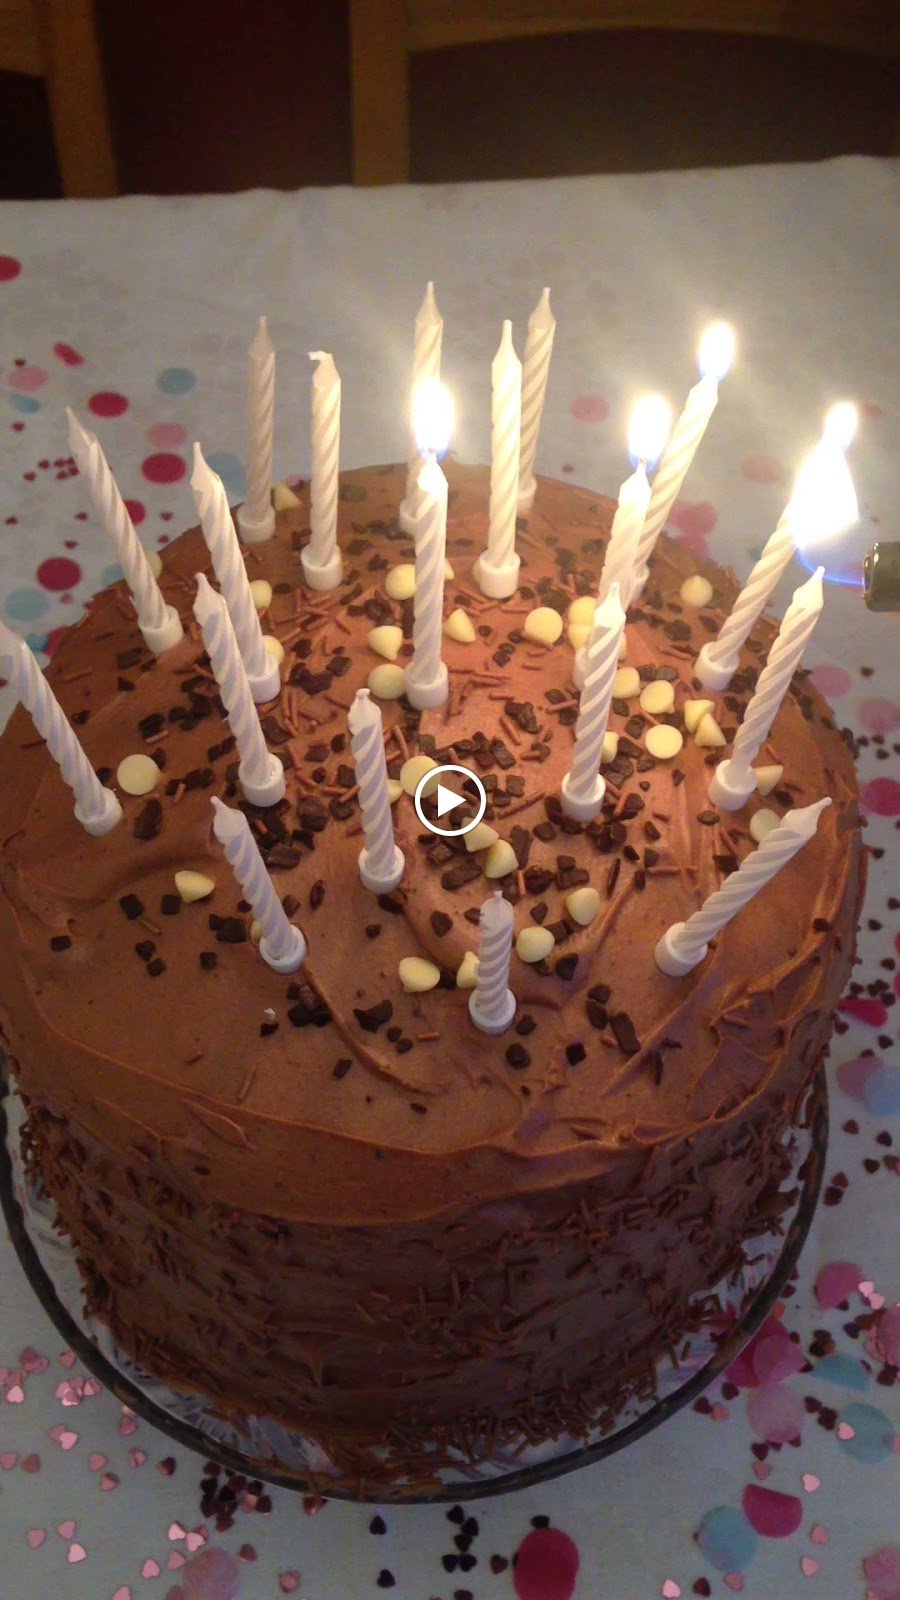
Caffé Mocaccino Celebration Cake

So, being a baking enthusiast and over all cake lover with a very stubborn idea of the perfect birthday cake for the day, I decided the only way forward would be to make my own. (and a damn good cake it was too if I may say so myself...)


 This pretty, chocolate butter frosting covered coffee and chocolate layered sponge with coffee flavoured butter frosting in-between was my own (and ultimate fave) creation. Coffee cake has got to be one of my all time fave flavours (even if I'm not a lover of the beverage its self... the infused flavour in a magical sweet treat won't go to waste around me ;)) When mixed with its long lost lover and ultimate partner in crime CHOCOATE! It will send your taste buds through the roof.

This cake, although coffee cake, for sure won't smack you in the face with a strong and bitter taste of the beverage but will make its presence with a subtle and sweet welcome. The perfect in-between cake, dodging the extreme sickly over chocolaty or strong coffee sponge recipes out there achieving the perfect balance right in the centre. It'll be sure to please everyone! and make the perfect birthday cake surprise.

(So without further a do, here goes the recipe... and what you've all been waiting for.)


Cappuccino and Chocolate Layer Sponge Cake Recipe

(a.k.a. The Mocha Celebration cake)


Ingredients:


Chocolate sponge:

175g Self Raising Flour
225g Muscovado Sugar
225g Soft Un-Salted Butter
4 Eggs
50g Cocoa Powder
1 tsp Baking Powder
 

Cappuccino Sponge:

225g Self Raising Flour
225g Muscovado Sugar
225g Soft Un-Salted Butter
4 Eggs
1 tsp Baking Powder
4 tsp Instant Coffee, Dissolved in 1 tbsp Boiling Water
 

Inner Filling:

225g Icing Sugar
100g Butter
4 level tsp instant coffee, dissolved in 1 tbsp warm water
1/2 tsp Vanilla Essence
 

Chocolate Covering:

225g Icing Sugar
100g Butter
1 1/2 tbsp Cocoa Powder
1 tbsp Warm Water
1/2 tsp Vanilla Essence
 
Decoration: Sprinkles, Chocolate shavings/ drops


Method: 


 For the Chocolate Sponge:

1. Pre-heat oven to 180ºC/350ºF/Gas Mark 4. Lightly grease and/ or line two 20cm (8 inch) sandwich tins.
2. Beat together the sugar and butter until light and fluffy.
3. Beat the eggs in a separate bowl and add to the mixture little at a time, beating well after in addition.
4. Sieve the Flour, Cocoa powder and baking powder over the mixture and fold in with a metal spoon.
5. Once smooth, divide the mixture into the two cake tins as evenly as possible and smooth over with a knife.
6. Bake for approx. 25-30 mins. Until Golden brown and firm to touch. Leave to cool for 10mins and turn out of tins on wire rack.
 

For the Cappuccino Sponge:

6. Repeat steps 1-4 in the chocolate sponge recipe above.
7. Once smooth, stir in the dissolved coffee until thoroughly blended and divide equally between two greased cake tins.
8. Bake for approx. 25-30mins. Until firm to touch and the sponge springs back when prodded. Leave to cool and turn out on cooling rack.
 

Filling:  

Once the sponges are completely cool, use a sharp knife to level three of the sponges, leaving a coffee sponge unlevelled for the top layer.

1. In a mixing bowl beat together butter, icing sugar, vanilla essence and the dissolved coffee.
2. Once smooth place a chocolate sponge on your cake tray/stand and use roughly 1/3 of the icing or enough to cover the sponge about 1cm thick.
3. Repeat step two with all the sponge layers, alternating the sponge. Chocolate, Coffee, Chocolate, Coffee.
4. Refrigerate for up to 10-15mins to ensure the icing has begun to set and the cake is sturdy.


Chocolate Frosting Coating:

1. Beat together the icing sugar, butter, cocoa powder, vanilla essence and water until smooth and fully blended. (Add more cocoa powder to adjust colour and taste.)
 
2. To ice the cake, carefully spoon the mixture on the top and sides using the back of the spoon the gently ease the mixture in to any gaps and begin smoothing out. (If your sponge is a little crumbly apply a thin layer of icing all over and refrigerate till firm to lock in the crumbs and carry on with the next steps; however this isn't always necessary.)
3. Using either an icing spatula or, alternatively, the back of a serving spoon and knife to gently cover the cake, roughly smoothing as you go.
4. Decorate the cake with your chosen sprinkles, fruit and other decorations and refrigerate till serving. (For best results refrigerate up to 30mins or an hour before serving to ensure the cake is sturdy and the icing has begun to harden.   
 
(Tip; This cake can be made and iced up to two days ahead, kept covered in the fridge. Iced or un-iced, it freezes well.)

Enjoy!
 
(Pictures below!)
* 


Don't forget to tag me on instagram (@apesjackson) and on twitter (@aprilroseo) if you recreate this amazing celebration cake. Comment below if you have any other scrummy recipes I should give a whirl.
If you enjoyed this recipe be sure to check out my Blueberry and Lemon loaf cake for something a little more tart but no less stratifying and a show stopper for the summer months. 
 
Hope you enjoyed, 
 
Much love,  -A
Xx


That's all for now folks,
 

XOXO -A
<3 


Friday, 5 June 2015

Jamie's Quiche Lorraine


Jamie Oliver's Recipe for Quiche Lorraine.
Tea/ Dinner/ Lunch/ or a good nibble for a party/ Savoury Tart  


Since I've been a sweet and healthy treats baking maniac, I thought I'd post a savoury recipe that I borrowed from the brilliant +Jamie Oliver. This savoury tart is the perfect summer tea whether you pair it with a salad and new potatoes, go full out with your BBQ spread and have it as an extra side or take it to party where it'll be sure to be a knock out nibble shared amongst friends and family. It's deffinatly a great sharing dish and a traditional occasion dish for the whole family.
Lets get cooking...!
 
 
Jamie's Quiche Lorraine Recipe
 

Ingredients:

Filling:
140g Ham
140g Gruyere Cheese, grated
140g Bacon, Diced or Lardons
1 tbsp. Butter  
250ml Milk
250ml Crème Fraiche 
2 Eggs
2 Egg Yolks
A Pinch of Nutmeg
 
Pastry:
500g Flour
1 tsp Salt
130g Unsalted Butter
2 Egg Yolks

Or
Pre-made Short Crust Pastry


Instructions:

 
Pastry:
1. For the pastry, combine the flour and salt in a food processor. Add the butter and egg yolks and process for 1 minute.
2.Then add about 4 tablespoons of cold water and pulse until the dough is combined.
3.Transfer to a lightly floured surface and gently kneed for 2 minuets, or until the dough is just combined.
4. Flatten to a disc, wrap in clingfilm and refrigerate for at least 1 hour.
5. Remove the dough from the fridge and rollout on a lightly floured surface to about 5mm thick.
6. Lay the pastry over a round 32cm tart tin, 4cm deep and carefully press in to the base and the sides. Trim any excess with a sharp knife.
7. Line the pastry with grease proof paper and refrigerate for 30 mins.
8. Pre heat the oven to 180C/gas 4. To blind bake the pastry, fill with pastry weights, rice, beans or lentils and bake for 15 mins.
9. Lift out the weights and bake for another 5 mins.
10. Remove from the oven and place the tin/ ceramic dish on an oven tray and leave to cool.
 
** If using ready bought pastry follow pastry steps 6 -10. **
 
 
Filling:
1. Meanwhile, melt the butter in a frying pan and cook the bacon or lardons. After cooked drain on kitchen paper and allow to cool.
2. Combine the ham, cheese and bacon and spread evenly over the cooled pastry case. Pre- heat the oven to 190C/gas 5.
3. Whisk the crème fraiche, eggs, egg yolks, milk and nutmeg in a bowl. Carefully pour the mixture into the pastry case.
4. Bake the quiche in the oven for 40-45 minutes until the filling has set and top is beginning to turn golden. Remove from the oven and allow to cool in tin/dish.
 
...once cool and ready to serve

Enjoy!
 

Per serving 519 cals, 34.5g fat (17.8g saturated), 16.2g protein, 34.7g carbs, 4.5g sugars


If you enjoyed this post give it a +1 and don't forget if you recreated this recipe tag me on instagram (@apesjackson) and twitter (@aprilroseo) and give Jamie Oliver a shout out too! (+Jamie Oliver). As always I hope you give this recipe a try, you wont be disappointed! It's by far the best quiche I've probably ever eaten, as say's the rest of my family too, when we had it for tea with jersey royal new potatoes, salad and chunky sliced tomatoes. (Certainly filled the hole and was absolutely delicious at the same time!)
 
Much love,  -A
Xx


That's all for now folks,
 

XOXO -A
<3