Friday, 4 December 2015

Rocking Rocky Road


IMG_4746

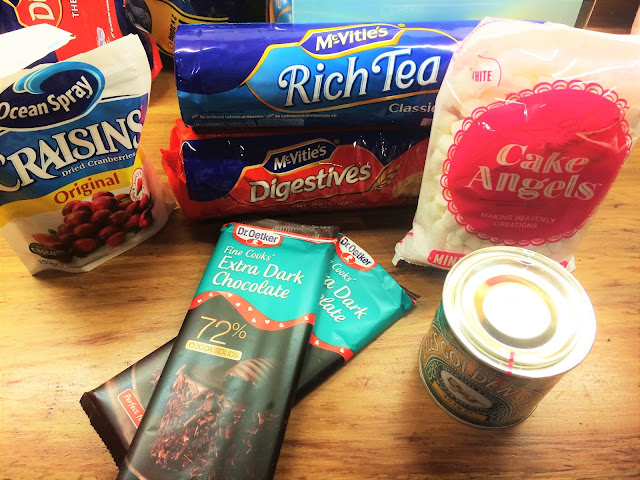
Ingredients:

100g Marshmallows
3tbsp Golden Syrup
125g Butter
300g Quality Dark Chocolate
200g Rich Tea Biscuits (or 400g Digestive Biscuits)
1 Handful Dried Cranberries or dried fruit of choice (optional)
 

Method:

1. Melt the butter, syrup and chocolate in a pan on a medium heat.
2. Put the biscuits in a freezer bag and bash with a rolling pin. (You preferably want a mix of crumbs and small chucks.)
3. Pour 3/4 of the mixture in a bowl with the biscuit and stir.
4. Put Leave the leftover 1/4 to one side.
5. Mix the marshmallows and dried cranberries in to the mixture in the bowl and any other optional dried fruit/ ingredients.
6. Scoop the mixture in to a square 25cm tin with a 5cm depth. Smooth the top as much as possible.
7. Pour the leftover 1/4 of melted chocolate over the top of the mixture in the baking tray and smooth with the back of a spoon.
8. Finally, chill in the fridge for minimum 2 hours or preferably over night.
Cut and enjoy!!


Thursday, 24 September 2015

Fruity Tutti No Bake Engery Bars

Clean Eating.

Raw Fruit and Nut Energy Bars:


Gluten Free, Wheat Free, Re-fined Sugar Free


Here's my recipe for Raw Fruit and Nut Energy Bars, a super tasty, quick and easy recipe that you can enjoy making with the kids for their packed lunches or in your spare time with the anticipation of the ever pending 'hangry' (hungry and angry) moments, where your suddenly in need of a quick pick me up but don't want to delve in to the abyss that is sugar overload land with the usual on the go snack. Hope you enjoy!


Raw Fruit and Nut Energy Bars


Ingredients:

75g almonds
40g dried apricots
5 medjool dates (stones removed)
1/2 tsp ground ginger
A pinch of cinnamon and nutmeg
20g dried cranberries
20g seedless raisins
Sprinkle of sunflower seeds


Method:

1. In a food processor blitz the almonds until a fine, bread crumb consistency.
2. Remove the almonds to a separate bowl and then again, in the food processor blitz your dried fruit, seeds and medjool dates until broken up in the small chunks.
3. Then add the previously ground almonds and the ginger, cinnamon and nutmeg to mix in the food processor and blitz until fully combined.
4. Transfer the mixture to either a flat glass dish or a plastic container. Press down firmly, I usually make mine about 1.5 -2 cm thick.
5. Store in the fridge for a few hours before consumption to allow the mixture to firm in to a bar. (I usually leave mine for half a day/ a day, depending on when the snack monster awakens.. ;)).
6. Once firm, cut in too 4-5 bars and snack away, guilt free knowing it's 100% healthy and happy.
(You could store these bars in the fridge in a air tight container or wrap in cling film. These bars are great for packed lunches or an on the go tasty energy boost.)


Hope you all enjoyed this recipe and hopefully give it a go! You wont be disappointed, they're (in my opinion) the best on the go snack out there and 100% good for you and super quick and easy to create a batch! As always, feel free to comment below or tag me on instagram and twitter. (I:@apesjackson and T:@aprilroseo)if you recreate this recipe or one similar!

Much love,  -A
Xx


That's all for now folks,


XOXO -A
<3

Saturday, 29 August 2015

Layer up with leather, 3 Autumnal looks.

Autumn is here!


Season Fix Style Edit.
Three style ideas for your leather shorts.

  So, as always get out your layered knits and start to polish those boots because we will sure be needing them.

Autumn is around the corner (if you live in England, it's already starting to feel like autumn with the dreary rain and cloudy days...) but don't fret, because with a new season comes a new wardrobe! (or at least in my imaginary wardrobe...).

For me, autumn is all about the natural colours that go along with the changing season, burgundy's and reds, oranges, dark greens, mustards and navy's. So, along those lines and inspired by my personal and slightly naughty spend up on shopping the other day... I've created three layered transitional outfits styled around leather shorts, also including similar alternative items of clothing and accessories to that featured and some change up extras to bring your outfit full circle, day to night, warm to chilly and casual to smart.

1. Dark elegance and minimalist texture. 
This outfit focuses on minimalism with the layering of texture and materials speaking for itself with only a subtle slip of colour. Leather shorts layered on top of either lycra or knitted tights. The simple yet beautifully cut delicate lace detail crop, fluffy and fun pom hair accessory and a suede leather rust coloured bag adding an overall autumnal feel.

 Outfit 

  Accessories 

Bag

 2. 70's and orange.
The 70's are on trend and orange is in so, with autumn on the doorstep this trend is totally welcomed. This outfit looks at incorporating the on trend staples and the classic autumnal orange with a chic city vibe pairing the perfect orange lip with a modern funky hair pom and a pair of step out in style mid heels.


 Outfit 

 Accessories  


3.  Suede persuasion.
Its time to think suede with this outfit, layering up the leathers and tying it all together with stand out gorgeous emerald shade accessories. (...which is bound to stun!) Accompanied with statement, flash back to the 60's, ankle booties and a black nail polish that radiates sass and romantic class.


 Outfit  

 Accessories  

    Similar items and occasion variations:  

Here, I've listed a few variations for different occasions and similar items to suit personal style and body shape. With occasions ranging from winter knit tights and light knit layers to a suedette skirt and platform boots for smarter occasions and finally a durable yet super fun floral print backpack just in time for the back to school season.
(Click images to go to linked webpage.)


http://www.asos.com/pgeproduct.aspx?iid=4954376&CTAref=Saved+Items+Page   http://www.asos.com/pgeproduct.aspx?iid=5080298&CTAref=Saved+Items+Pagehttp://www.asos.com/pgeproduct.aspx?iid=5474092&CTAref=Saved+Items+Page


http://www.asos.com/pgeproduct.aspx?iid=5386388&CTAref=Saved+Items+Page        http://www.asos.com/american-retro/american-retro-gabin-leather-short-dungarees/prod/pgeproduct.aspx?iid=4985901&clr=Black&SearchQuery=leather+dungarees&pgesize=5&pge=0&totalstyles=5&gridsize=3&gridrow=2&gridcolumn=2    http://www.asos.com/pgeproduct.aspx?iid=5518128&CTAref=Saved+Items+Page


http://www.asos.com/pgeproduct.aspx?iid=5265620&CTAref=Saved+Items+Page    http://www.asos.com/pgeproduct.aspx?iid=5065934&CTAref=Saved+Items+Pagehttp://www.asos.com/pgeproduct.aspx?iid=5223123&CTAref=Saved+Items+Page


http://www.asos.com/pgeproduct.aspx?iid=5440277&CTAref=Saved+Items+Page    http://www.asos.com/pgeproduct.aspx?iid=5332200&CTAref=Saved+Items+Pagehttp://www.asos.com/pgeproduct.aspx?iid=5389829&CTAref=Saved+Items+Page


http://www.asos.com/pgeproduct.aspx?iid=5231793&CTAref=Saved+Items+Page    http://www.asos.com/pgeproduct.aspx?iid=4549019&CTAref=Saved+Items+Pagehttp://www.asos.com/pgeproduct.aspx?iid=5231520&CTAref=Saved+Items+Page


http://uk.accessorize.com/view/product/uk_catalog/acc_17,acc_1.1/8892739700     http://www.asos.com/pgeproduct.aspx?iid=5250216&CTAref=Saved+Items+Pagehttp://www.asos.com/asos/asos-mini-boxy-shoulder-bag/prod/pgeproduct.aspx?iid=5451939&clr=Berry&SearchQuery=purple+bag&pgesize=19&pge=0&totalstyles=19&gridsize=3&gridrow=1&gridcolumn=1


 It's time to love you and leave you now but as always, I hope you enjoyed this blog post. Also if you have any tips or fave trends for autumn I'd love to hear what's on your autumn loves list. 

If you end up buy any of the above looks or pieces feel free to comment below or tag me on instagram and twitter. (I:@apesjackson and T:@aprilroseo). I'm always interested to see what combinations you come up with!

Much love,  -A
Xx


That's all for now folks,


XOXO -A
<3


Thursday, 30 July 2015

Vanilla and Raspberry Birthday Cake Recipe

Vanilla and Raspberry Sponge Spectacular.


For those new to my blog, I recently uploaded the blog post; Cappuccino and Chocolate Birthday Cake Recipe, where I shared the recipe for my homemade birthday cake. (Giving me the luxury to hand custom my fave flavours and experiment with the all and powerful four layer cake design). If this wasn't enough I also made my brother's birthday cake too. I'm a triplet, meaning a multiple birth of three, I have two siblings (brothers- lucky me... ahah!) of who I share the same birthday with. With my kind nature (of which is under appreciated as always...) I made my brother a birthday cake too! And so began the creation of the classic but oh so special  Vanilla and Raspberry Jam Layer Birthday Cake Surprise. (My other brother wasn't home for our birthday, otherwise I would have ended up making three!)

 So, here goes...
 

The Vanilla and Raspberry Sponge Spectacular Recipe

 
 (Yep this is going to be a big one; the perfect blow out surprise celebration cake).
 

Ingredients:


For the Four Sponges:

450g Butter
450g Caster Sugar
450g Self Raising Flour
8 Medium Eggs
1/2 tsp. Vanilla Essence
 

Inner Filling:

225g Icing Sugar
100g Butter
1 tbsp. Milk
1/2 tsp. Vanilla Essence
Raspberry Jam (or strawberry if preferred).
 

Chocolate Covering:

225g Icing Sugar
100g Butter
1/2 tsp. Vanilla Essence
1 tbsp. Warm Water
1 1/2 tbsp. Cocoa Powder


Method:


For the Sponges:

1. Pre-heat oven to 180ºC/350ºF/Gas Mark 4. Lightly grease and/ or line two 20cm (8 inch) sandwich tins.
2. Beat together the sugar and butter until light and fluffy.
3. Add the vanilla essence then beat the eggs in a separate bowl and add to the mixture little at a time, beating well after in addition.
4. Sieve the flour over the mixture and fold in with a metal spoon.
5. Divide the mixture equally between the tins and smooth over with the back of a spoon.
6. Bake for approx. 25-30 mins. Until Golden and firm to touch. Leave to cool for 10mins and turn out of tins on wire rack.
 
(If you only have two tins, half the mixture and cook two at a time).


For the filling:

Once the sponges are completely cool, use a sharp knife to level three of the sponges, leaving a sponge unlevelled for the top layer.
1. In a mixing bowl beat together butter, icing sugar, milk and vanilla essence. Also set aside the jam in a small bowl the fringe to cool after beating smooth.
2. Once the icing is smooth place a sponge layer on your cake tray/stand and use roughly 1/3 of the icing or enough to cover the sponge about 1cm thick (add more or less depending on your preferred amount).
3. On a second sponge layer spread 3-4 spoonful's of the raspberry jam and gently place jam side down on to of the butter icing covered sponge. 
4. Repeat with the next two layers.
5. Refrigerate for up to 30-60mins to ensure the icing has begun to set and the cake is sturdy before coating the outside. (If a little wobbly just place in the fridge for 10-15mins between each layer).
 

Chocolate Frosting Coating:

1. Beat together the icing sugar, butter, cocoa powder, vanilla essence and water until smooth and fully blended. (Add more cocoa powder to adjust colour and taste.)
2. To ice the cake, carefully spoon the mixture on the top and sides using the back of the spoon the gently ease the mixture in to any gaps and begin smoothing out. (If your sponge is a little crumbly apply a thin layer of icing all over and refrigerate till firm to lock in the crumbs and carry on with the next steps; however this isn't always necessary.)
3. Using either an icing spatula or, alternatively, the back of a serving spoon and knife to gently cover the cake, roughly smoothing as you go.
4. Decorate the cake with your chosen sprinkles, fruit and other decorations and refrigerate till serving. I added fresh raspberries and chocolate sprinkles. (For best results refrigerate up to 30mins or an hour before serving to ensure the cake is sturdy and the icing has begun to harden.)   
 
(Tip; This cake can be made and iced up to two days ahead, kept covered in the fridge).
Enjoy!
 
(Pictures below!)


Don't forget to tag me on instagram (@apesjackson) and on twitter (@aprilroseo) if you recreate this spectacular occasion cake. Comment below if you have any other scrummy recipes I should give a whirl.
If you enjoyed this recipe be sure to check out my birthday cake Cappuccino and Chocolate Birthday Cake Recipe or my Blueberry and Lemon loaf cake for something a little more tart but no less satisfying and a show stopper for the summer months. 
 
Hope you enjoyed, 
 
Much love,  -A
Xx


That's all for now folks,
 

XOXO -A
<3